DIY Manicure and Pedicure
Having time to do your nails with young children can be hard, but does not have to be impossible. Knowing how time limited mums can be, the best time to do you manicure and pedicure is at night when the children are asleep. If that is not possible, try to do it when they are happily occupied, playing a game or watching TV.
Dependant on when you do your manicure or pedicure, you may wish to skip certain steps or only do the manicure today and the pedicure another day. Getting an at home nail kit suitable for you as well as gel polish – which lasts longer and dries quickly – are excellent ideas too!
Here are our tips on achieving a great DIY manicure and pedicure at home.
1. Start Anew
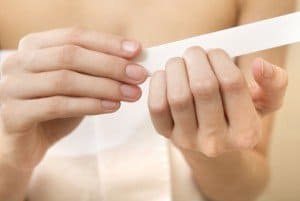 Using acetone and a soft cottonwool segment or pad remove all the old nail polish from your finger and toe nails. Then using a good quality nail clipper, trim your nails and file them to the shape desired. At this point, you can use a buffing block/tool to smooth out any bumps and to take away yellow stains from previous polish.
2. Soft, Smooth Skin
For quick manicures and pedicures, you can skip this step, however, to get the most out of your feet and hands, take a few minutes to revitalise your skin. If possible, perform your manicure straight after a bath/shower as your skin is soft and pliable. If this is not possible, soak your feet/hands in water for 5 or so minutes. Remove, pat dry and then exfoliate to remove dead skin. Place back in the water to remove exfoliating scrub and then dry your feet. Repeat with your hands. Once dry use a foot scrubbing/filing tool to remove any hard/callous skin.
3. Cuticles and Care
While your skin is still soft, it is the ideal time to focus on your cuticles. You can further soften them with cuticle cream around your nails. Then using an orange stick, push back your cuticles and shape them as desired. Now is also the time to clean under your nails and to moisturise your hands and feet all over. Body Butter or specialised Heel Balm cream is ideal to help remove heel cracks. Almost ready, just quickly wipe over your nails with the acetone again to remove any oily residue from the creams.
4. Back to Base
Now it’s time to apply your base coat. Applying a base coast is important for a number of reasons. Firstly it will smooth out further bumps/ridges on your nails. Secondly is reduces the chance of staining occurring on your nails and thirdly for your finger nails the base coats help strengthen the nails.
5. Polish Time
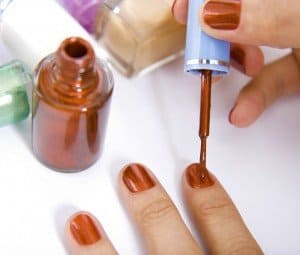 For pedicures, place separators between your toes to stop the polish from bumping and ruining. I find it easier to do your toe nails first and then your finger nails, however, this is subjective to personal preference. Do an initial coat on all your nails and then let it dry.
The best way to put polish on your nails is with an initial stroke of polish down the middle of the nail with another stroke either side of this line. Place the polish brush back into the polish bottle as often as needed so that you get an even coat with each swipe. Try not to have too much polish on the brush and ensure that each coat has dried thoroughly before adding another.
Rather than wait for ages for polish to dry, you can use a good nail dryer for drying nail art. Choosing the best LED light for nails dries nails quickly for a professional finish.
6. Topping It Off
Finally, after two coats of your desired colour, a top coat of polish is recommended to provide a high gloss look and to help prevent the polish from chipping.
7. Almost done… now just relax and let it dry
It can be hard to sit still and wait, however the last thing you want to do is ruin your Manicure or Pedicure by moving and touching things. Allow your nails to completely dry all over to give you the best results.
Enjoy the result and share with us any further tips you have for a quick and easy DIY Manicure and Pedicure
Find great Nail Art ideas and tips here.